Create Simple Python GUI Applications with Gooey
Janne Kemppainen |This time I’m going to show you how to create simple GUI applications in Python using a package called Gooey. It lets you turn (almost) any command line Python application into a GUI application with one line.
When I do screen recordings with OBS Studio the output files are stored in the .mkv format. However, my video editing software prefers the mp4 format so I have to do the conversion using ffmpeg. So whenever I need to do the conversion I have to type something like this on the command line:
ffmpeg -i '.\2020-02-10 22-22-57.mkv' -c:a copy -c:v copy "screencapture.mp4"
I thought that this might actually be the perfect opportunity to try out Gooey, create a useful utility for myself, and write an article about it.
You can also find the code from my GitHub repository.
Something to GUI’ize
First we’ll need to build the script that we want to create the GUI for. The starting point needs to be an application that uses the argparse module to parse command line arguments. So, looking at the ffmpeg command here’s what we need:
- input file
- output file
That should be simple enough.
Even though the ffmpeg call is super simple I’ll be also using the ffmpeg-python package to handle the execution instead of directly using Python’s built in subprocess because this reduces the amount of code that I need to write. It’ll also make it easier to expand the project later on if new features are required.
Setting up the environment
As always, the first step is to set up the Python virtual environment. I’m using Windows but you probably already know how this works in your own environment.
First, let’s create the requirements.txt file:
Gooey
ffmpeg-python
Then, create the virtual environment, activate it and install the dependencies:
>> python -m venv venv
>> .\venv\Scripts\activate
>> python -m pip install -r requirements.txt
CLI application
Next we’ll need to implement the logic as a command line application. Let’s start with a simple script that is just parsing the arguments using argparse. I’m storing it as converter.py.
from argparse import ArgumentParser

def main():
    parser = ArgumentParser()
    parser.add_argument(
        "-i",
        "--input_file",
        required=True,
        help="File to be converted"
    )
    parser.add_argument(
        "-o",
        "--output_file",
        required=True,
        help="Path for the converted file"
    )
    args = parser.parse_args()


if __name__ == "__main__":
    main()
While this application doesn’t really do anything yet it is still runnable and you can print out the help message:
>> python converter.py -h
usage: converter.py [-h] -i INPUT_FILE -o OUTPUT_FILE

optional arguments:
  -h, --help            show this help message and exit
  -i INPUT_FILE, --input_file INPUT_FILE
                        File to be converted
  -o OUTPUT_FILE, --output_file OUTPUT_FILE
                        Path for the converted file
Let’s add the file conversion. We can make the program functional with only a small amount of added code:
import ffmpeg

from argparse import ArgumentParser


def main():
    parser = ArgumentParser()
    parser.add_argument(
        "-i",
        "--input_file",
        required=True,
        help="File to be converted"
    )
    parser.add_argument(
        "-o",
        "--output_file",
        required=True,
        help="Path for the converted file"
    )
    args = parser.parse_args()
    convert(args.input_file, args.output_file)


def convert(infile, outfile):
    (
        ffmpeg
        .input(infile)
        .output(outfile, vcodec="copy", acodec="copy")
        .run()
    )


if __name__ == "__main__":
    main()
The convert function uses the ffmpeg-python package to call ffmpeg with the correct parameters. It uses the “fluent” interface of the library where the function calls can be chained together and finally applied with the run() function.
You can use the converter to switch between file formats:
>> python converter.py -i '2020-04-22 16-10-28.mkv' -o 'output.mp4'
This doesn’t differ much from running ffmpeg directly.
Create the GUI
Now we get to the interesting part, creating the GUI. The default implementation is extremely simple, import Gooey and use it to decorate the main() function call where the arguments are parsed:
from gooey import Gooey

@Gooey()
def main():
    parser = ArgumentParser()
    parser.add_argument(
    ...
Now that we are using Gooey we omit the input parameters and start the application with
>> python converter.py
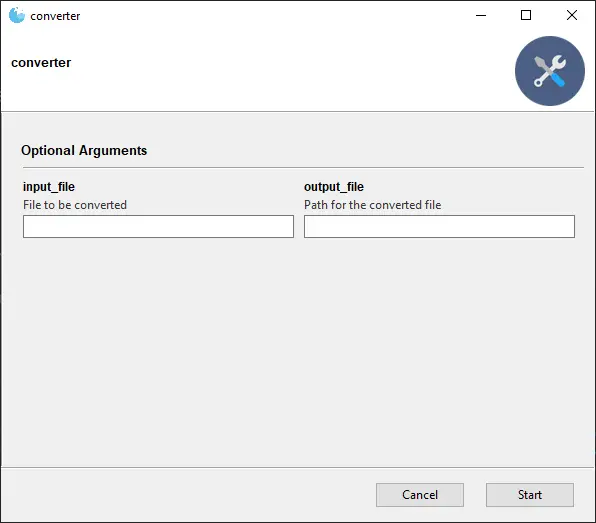
With just those two added lines we get this result:

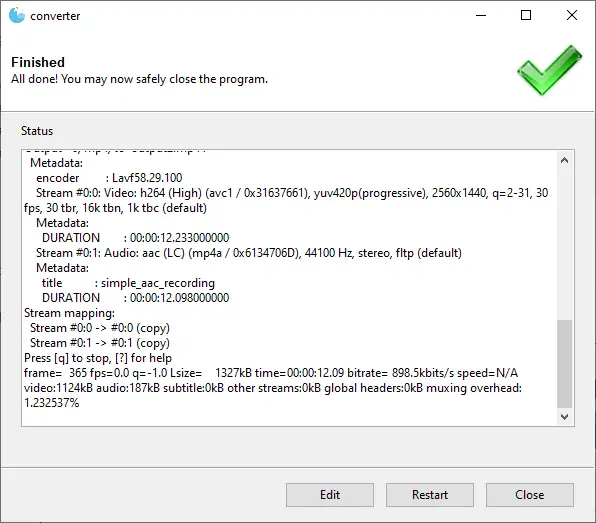
And when you run the script you can see the console logs too. Neat!

As you can see, in the ideal case building a GUI with Gooey can be super simple.
Customize name and description
The default configuration is already functional and looks quite nice but we can make it even better by adding some manual customization. This can be done by passing arguments to the Gooey decorator.
@Gooey(
    program_name="Video Converter",
    program_description="Convert between different video formats",
)
All global configuration parameters are described in the README file in the GitHub repository. They let you set things such as window size, language, location for custom images, or a regex for parsing execution progress. Here I’m only setting the name and description of the program.
Smarter input fields
The input fields can be customized by using the GooeyParser which is a drop-in replacement for ArgumentParser that adds some Gooey-related configuration options.
By default Gooey maps arguments to input widgets automatically. With the help of GooeyParser you can define the widget types manually. In my application I need to be able to choose a file and then select a location where to save the converted file so the FileChooser and FileSaver widgets are exactly what I need.
Here is the modified main function:
@Gooey(
    program_name="Video Converter",
    program_description="Convert between different video formats",
)
def main():
    parser = GooeyParser()
    converter = parser.add_argument_group("Video Converter")
    converter.add_argument(
        "-i",
        "--input_file",
        required=True,
        help="File to be converted",
        widget="FileChooser",
        gooey_options=dict(wildcard="Video files (*.mp4, *.mkv)|*.mp4;*.mkv")
    )
    converter.add_argument(
        "-o",
        "--output_file",
        required=True,
        help="Path for the converted file",
        widget="FileSaver",
        gooey_options=dict(wildcard="MPEG-4 (.mp4)|*.mp4")
    )
    args = parser.parse_args()
    convert(args.input_file, args.output_file)
Some widgets accept additional parameters that can be passed in by using the gooey_options argument. The value should be a dictionary mapping of the desired widget specific settings.
I’m only using the wildcard setting which accepts a wildcard string that matches the wxPython FileDialog wildcard format which uses the pipe character | as a separator. The first part is the description of the format that is shown on the file selector dialog, and the second part is the file type that should be matched.
You can add multiple file type choices for the dropdown selection by adding new description and file type pairs separated with the pipe character. You can also use a semicolon as a separator to match multiple file types in one group like I’m doing with the file chooser.
The file type selection on the file chooser dialog looks like this:

And this is the file save dialog:

The file inputs have also changed as they now contain buttons that open the file dialogs.

You can read the Gooey options page for more information about the customization options.
Alternative functionality with subparsers
So far the application is able to convert a single file to another format. However, it would be nice to have the option to process multiple files at the same time. This requires a different set arguments so one solution is to create a tabbed layout with subparsers.
The default navigation type for multiple subparsers is with a sidebar list. This can be changed with the global configuration variable navigation on the Gooey decorator. I have also changed the default size of the application window to better match the controls.
@Gooey(
    program_name="Video Converter",
    program_description="Convert between different video formats",
    default_size=(600, 720),
    navigation="TABBED",
)
Single file handler
In the main function we need to create a subparser for each tab in the application. They need to be added to the subparser group which can be created with the add_subparsers method from the built-in ArgumentParser. The dest parameter sets the argument name that should store the name of the selected subparser when execution starts. This helps us detect the correct group of arguments during the program execution.
def main():
    """test"""
    parser = GooeyParser()
    subs = parser.add_subparsers(help="commands", dest="command")
The additional parsers are added to the group of subparsers using the add_parser method. The first parameter is the name of the parser which will be stored in the “command” destination that we defined above. The prog argument sets the program name for the subparser and Gooey uses this as the title for the tab. Because I want to use only one group of arguments for the single file converter I have chained the add_argument_group call with the add parser call. I’ve also set the title of the group to an empty string so that it won’t be displayed because the same information is also available on on the tabs.
    converter = subs.add_parser(
        "file_convert", prog="File convert",
    ).add_argument_group("")
Next, the arguments can be added normally.
    converter.add_argument(
        "input_file",
        metavar="Input file",
        help="File to be converted",
        widget="FileChooser",
        gooey_options=dict(
            wildcard="Video files (*.mp4, *.mkv)|*.mp4;*.mkv", full_width=True,
        ),
    )
    converter.add_argument(
        "output_file",
        metavar="Output file",
        help="Path for the converted file",
        widget="FileSaver",
        gooey_options=dict(
            wildcard="MPEG-4 (.mp4)|*.mp4|Matroska (.mkv)|*.mkv", full_width=True,
        ),
    )
The parameters for single file handling are now ready.
Batch handler
The batch handler needs more complicated arguments. First we’ll have to create a new subparser as we did for the single file handler to create a new tab in the UI.
    batch_converter = subs.add_parser(
        "batch_convert", prog="Batch convert",
    )
There will be two argument groups so here I’m adding the group with the input files and output directory selectors. The name of this group is set to an empty string.
    batch_group = batch_converter.add_argument_group("")
    batch_group.add_argument(
        "input_files",
        metavar="Input files",
        help="List of files to convert",
        widget="MultiFileChooser",
        gooey_options=dict(
            wildcard="Video files (*.mp4, *.mkv)|*.mp4;*.mkv", full_width=True,
        ),
    )
    batch_group.add_argument(
        "output_directory",
        metavar="Output directory",
        help="Directory for file output",
        widget="DirChooser",
        gooey_options=dict(full_width=True,),
    )
The converter needs some additional information to be able to convert multiple files and these options form the second group. We have two choices for the filenames:
- use the original filenames with new file extensions
- use a common base name and create a numbered sequence
    batch_conversion_settings = batch_converter.add_argument_group(
        "Conversion settings"
    )
Radio button selection can be added by creating a mutually exclusive argument group. The title of the group can be set via the gooey_options configuration. At the time of writing this wasn’t a well documented feature so I had to inspect the source code to find this out.
The store_true action makes the original filename selection behave as a Boolean argument. However, the file prefix argument is using the custom TextField widget which will be greyed out when the selection is not active.
    filename_group = batch_conversion_settings.add_mutually_exclusive_group(
        required=True,
        gooey_options=dict(title="Choose the file naming scheme", full_width=True,),
    )
    filename_group.add_argument(
        "--original_filename", metavar="Keep original filename", action="store_true"
    )
    filename_group.add_argument(
        "--file_prefix",
        metavar="Create a sequence",
        help="Choose the file prefix",
        widget="TextField",
        default="video",
    )
The final argument gets the file extension from a dropdown menu which ultimately sets the format of the converted file.
    batch_conversion_settings.add_argument(
        "--file_extension",
        metavar="File extension",
        required=True,
        widget="Dropdown",
        choices=[".mp4", ".mkv"],
        default=".mp4",
    )

    args = parser.parse_args()
    run(args)
Application logic
Now that the argument parsing and GUI is ready the actual logic needs to be updated too to handle processing of multiple files. If you look at the previous piece of code you’ll notice that I have refactored the rest of the logic to a function called run. It looks like this:
def run(args):
    if args.command == "file_convert":
        convert(args.input_file, args.output_file)
    elif args.command == "batch_convert":
        if args.original_filename:
            file_prefix = None
        else:
            file_prefix = args.file_prefix

        convert_multiple(
            args.input_files, args.output_directory, args.file_extension, file_prefix,
        )
As I already said with the subparser list initialization the name of the selected subparser is stored as command in the argument namespace. If the file convert tab was selected when starting the execution the input and output files are obtained as before and the convert function is called normally.
If the selected tab was for batch conversion, however, the output file prefix will first be defined according to the inputs. Then the conversion is done in another function called convert_multiple.
def convert_multiple(infiles, outdir, file_extension, file_prefix):
    input_files = infiles.split(";")

    for index, infile in enumerate(input_files):
        if file_prefix:
            output_filename = f"{file_prefix}{index}{file_extension}"
        else:
            input_filename = os.path.basename(infile)
            output_filename = os.path.splitext(input_filename)[0] + file_extension
        outfile = os.path.join(outdir, output_filename)
        convert(infile, outfile)
The multifile conversion takes the list of selected files (as a string), the output directory, the desired file extension and the possible file prefix as its input arguments.
The list of input files is a semicolon separated string which needs to be split to a list of strings first.
If the file prefix was defined the file name will start with the prefix, then have the index of the current processed file, and finally the selected file extension. Otherwise the original name of the input file is used but the file extension is changed.
The convert function remains the same.
def convert(infile, outfile):
    (
        ffmpeg.input(infile)
        .output(outfile, vcodec="copy", acodec="copy")
        .run(overwrite_output=True)
    )
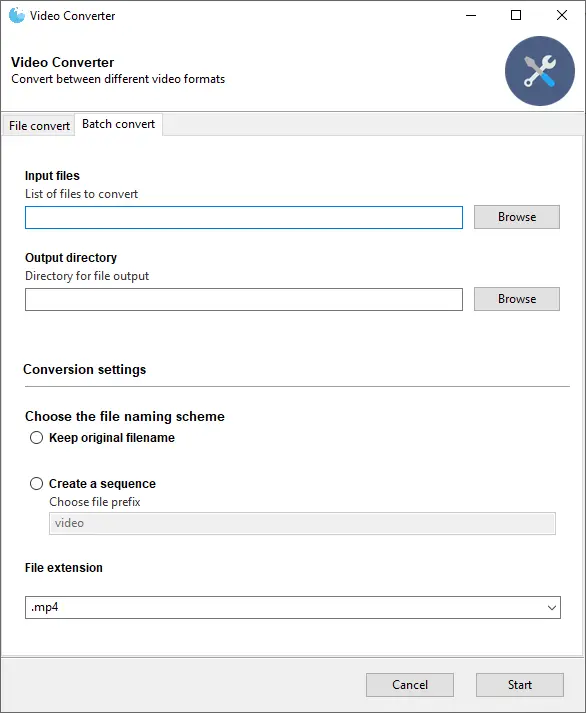
The batch conversion view now looks like this:

The input parameters each have suitable widgets and the radio button group allows only one naming scheme to be selected. Notice how the file prefix field is greyed out when the corresponding radio button is not selected.
Progress bar
One neat feature that we can add is a progress bar that shows how far we are in the processing loop. Gooey implements this by parsing output from the script. Simply define the progress_regex parameter with a regular expression that matches your progress message format.
@Gooey(
    program_name="Video Converter",
    program_description="Convert between different video formats",
    default_size=(600, 720),
    navigation="TABBED",
    progress_regex=r"^Progress (\d+)$",
)
The configuration shown above expects a message that looks something like “Progress 50” on stdout. Let’s define a helper function to print the completed percentage based on the current index and the total amount of items:
def print_progress(index, total):
    print(f"Progress {int((index + 1) / total * 100)}")
    sys.stdout.flush()
The sys.stdout.flush() call makes sure that the print output is not being buffered.
We can then call this helper function in the batch processing loop after each conversion:
def convert_multiple(infiles, outdir, file_extension, file_prefix):
    input_files = infiles.split(";")

    for index, infile in enumerate(input_files):
        ...
        convert(infile, outfile)
        print_progress(index, len(input_files))
Now a progress bar is shown during the execution of the script.

Conclusion
That was a short introduction to Gooey. As you can see you can achieve working results quite fast. However, fine tuning the interface for better user experience requires some knowledge of the library. I also noticed that the documentation could be improved as some parts were not that intuitive and required taking a look at the source code.
If you only need a simple GUI for your Python script then Gooey might be the ideal choice for you. If, on the other hand, your requirements are more complex then it might be worthwhile to learn a GUI framework which will give you all the freedom to implement what you need.
How did you like this tutorial? Share your comments on Twitter!
Read next in the Python bites series.
Discuss on Twitter
If you need to build a GUI for your Python command line application check if the Gooey package would suit your project #pythonprogramming https://t.co/xUf1VfSqbB
— Janne Kemppainen (@pakstech) May 21, 2020
Previous post
Create Your Own Python Packages

