Configure Nextcloud Behind a Cloudflare Tunnel
Janne Kemppainen |When you set up a private Nextcloud installation on your home server and want to have it accessible from the outside network you traditionally need to poke a hole in your NAT and set up dynamic DNS to be able to find the correct IP every time. With Cloudflare Tunnel you can connect to your server without ever exposing your IP address to the world.
Cloudflare Tunnel is a free service that can be used to securely connect origins directly to Cloudflare. Your web server runs a daemon process called cloudflared which creates an encrypted tunnel to Cloudflare. Since the connection is initiated from within your network there is no need to open any ports to the outside world.
When the tunnel connection is established and everything is configured properly the site can be accessed with a domain name. That means that you actually need to own a domain and configure DNS to point to the tunnel. If you already own a domain you can easily create a new subdomain for the Nextcloud installation as long as you use the Cloudflare DNS servers.
If you don’t have a domain yet then you need to buy one. Many domains cost only a few dollars per year, so it’s not a huge investment. I get all my domains from Porkbun since they have good prices and we get domain privacy for free. I’ve had zero issues with them so far, everything has just worked as it should.
My personal Nextcloud installation runs as a Turnkey Linux container on my proxmox home server. Depending on your Nextcloud installation method there might be some differences where the correct directories are located.
I assume that you have already created a Cloudflare account.
Configure Cloudflare Tunnel
The first thing you need to do is to install cloudflared on your server. If you’re running multiple virtual machines or containers then the tunnel does not need to be initiated from the same VM. For example in my case I have a separate Ubuntu server that handles all my tunneling needs.
The installation page contains installation details for all operating systems. If your Linux variant uses Deb packages then you can perform the installation with these commands:
$ wget -q https://bin.equinox.io/c/VdrWdbjqyF/cloudflared-stable-linux-amd64.deb
$ sudo dpkg -i cloudflared-stable-linux-amd64.deb
To update cloudflared to the latest version you can use:
$ cloudflared update
2021-07-24T07:16:09Z INF cloudflared is up to date version=
Next you need to authenticate with Cloudflare with this command (follow the instructions)
$ cloudflared tunnel login
Please open the following URL and log in with your Cloudflare account:

https://dash.cloudflare.com/argotunnel?callback=https%3A%2F%2Flogin.cloudflareaccess.org%2FeVoSuQcRVu3D-BYInW7YqFoOZWqjY8m2D504OLJKyys%3D

Leave cloudflared running to download the cert automatically.
You have successfully logged in.
If you wish to copy your credentials to a server, they have been saved to:
/home/janne/.cloudflared/cert.pem
This will download a certificate file to your home directory on the server so that you can perform actions such as creating new tunnels.
Next, you need to create the tunnel with
$ cloudflared tunnel create nextcloud
Tunnel credentials written to /home/janne/.cloudflared/01f0928b-6a11-4254-854c-4173b5b74f2e.json. cloudflared chose this file based on where your origin certificate was found. Keep this file secret. To revoke these credentials, delete the tunnel.

Created tunnel nextcloud with id 01f0928b-6a11-4254-854c-4173b5b74f2e
The last parameter is the name of the tunnel. You can use any string, and it doesn’t need to match the hostname, or anything else for that matter. I chose to go with the name nextcloud.
Create a new configuration file and save it to /etc/.cloudflared/config.yml. You’ll need to use sudo to be able to write there. The file should look something like this:
tunnel: 01f0928b-6a11-4254-854c-4173b5b74f2e
credentials-file: /home/janne/.cloudflared/01f0928b-6a11-4254-854c-4173b5b74f2e.json

ingress:
  - hostname: nextcloud.pakstech.download
    service: http://192.168.1.22
  - service: http_status:404
Use the tunnel ID and the credentials file that you got from the command where the tunnel was created. Then the ingress section should define where each hostname should be routed to. Since my Nextcloud installation is not running on the same VM I have to use its local IP address on my network. The same tunnel can contain multiple hosts!
Validate the configuration file:
$ cloudflared tunnel --config /etc/cloudflared/config.yml ingress validate
If the tunnel and the Nextcloud server are running on the same machine then you can replace the IP address with http://localhost. And if you’re running on a non-standard port then you need to define that too, for example http://localhost:8000.
Now you need to configure the DNS settings on the Cloudflare web dashboard. Add a CNAME record that matches your selected domain and set the target to <your-tunnel-id>.cfargotunnel.com:
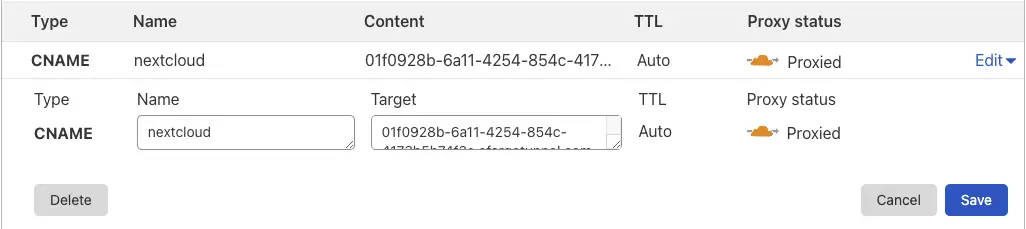
If you have many services using the same tunnel then you need to configure a CNAME entry for each hostname.
Finally you need to start the tunnel. Since you don’t want the tunnel to be open only when you’re actively running the tunneling command on your server, it’s best to install it as a service:
$ sudo cloudflared service install
Then start and enable the service
$ sudo systemctl start cloudflared
$ sudo systemctl enable cloudflared
These commands start the cloudflared service that will now always run in the background and automatically start when the server boots up.
If you need to make changes to the configuration file in /etc/cloudflared/config.yml you also have to restart the service:
$ sudo systemctl restart cloudflared
Configure Nextcloud to allow the domain
Now you should be able to access the your Nextcloud server through the configured domain. However, you will get the “Access through untrusted domain” error when you open the webpage.
This is a safety measure to protect you from attacks by using malicious domains. As the error message says, you need to add your domain to the trusted_domains list in the configuration file.
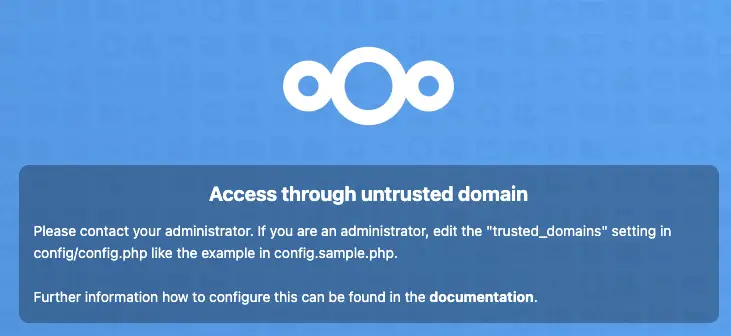
You need to edit the config.php file found in the Nextcloud installation directory. In my case the file can be found from /var/www/nextcloud/config/config.php. Within that file there is a section for trusted domains where you need to add your new domain:
'trusted_domains' =>
  array (
    0 => 'localhost',
    1 => '192.168.1.22',
    2 => 'nextcloud.pakstech.download',
  ),
After you have saved the changes you should be able to open the page again and log in normally.
When you have access to your local network you should really use the private IP address of the Nextcloud server since that is going to give you better performance. After all, when you use the tunnel, any files that you send must first be sent over to Cloudflare servers and then back to your local server. With the private IP address you can still bypass the tunnel.
Conclusion
With Cloudflare Tunnel you can provide secure access to your Nextcloud server. To further understand how everything works I recommend that you spend some time reading the Cloudflare Docs.
If you have any questions or spot errors then you can reach me on Twitter!
Previous post
Run GitHub Actions on Issue CommentsNext post
Add Videos to a GitHub Repo Readme