Create a Github Action with JavaScript
Janne Kemppainen |There are plenty of actions available in the GitHub Actions Marketplace but sometimes you may come up with a use case that can’t be solved with existing actions. In that case it is super useful to be able to create your own actions. That is what you will learn from this post.
There are two ways to implement custom actions. The first and recommended way is to use JavaScript but you can also create a Dockerized action if required. In this post we will create a JavaScript action so at least some JavaScript knowledge is assumed.
Generally, JavaScript actions execute faster than the Docker alternative as the actions runner doesn’t need to fetch the container image and can start executing the steps right away. For some more complex environments you may need to run a Docker container so just remember that it is also an option.
Before starting, if you need a general introduction to GitHub Actions check out my Gentle Introduction to GitHub Actions. The GitHub Actions documentation also contains lots of information and should be the first place to check when you encounter problems.
The code for the action that I’m building here is available on the jannekem/publish-schedule-action repository.
Plan what is needed from the action
Before you jump to implementing an action you should really take some time and plan it out in advance. Think about the requirements and features you want to include and what things are within the scope of your action.
The questions
Make sure that you ask yourself at least these questions:
- What are the inputs and outputs?
- What is the essential functionality?
- Are there some ’nice to have’ features?
- What features are already well implemented by other actions? Can you limit the scope?
- Can the action be generalized?
Spending some time planning can save time during the implementation because you have already defined the interfaces and the required features. Limiting to the essential functionality in the first version allows you to start testing the action faster and then refine the plan based on your findings.
Also checking out the other available actions can help limit the scope as you’ll probably find out that a part of your designed workflow has already been implemented elsewhere. So don’t reinvent the wheel but try to integrate well with existing actions.
By making the action general enough you maximize its usefulness to other people. And if they start using your action you could even start receiving improvements via pull requests. (Or people start asking for new features.)
Example
I will use my Markdown Publish Schedule action as the example in this post. So how does the scope planning apply in this case?
A little background information about my blog: I write my blog posts as Markdown files that contain a front matter that tells the title of the post, publish date, categories, and so on. I use a static site generator called Hugo which generates static HTML from those files. The site is hosted on Netlify which builds the site automatically each time that I push changes to the GitHub repository where I store my content.
My goal is to create a workflow where I can schedule a blog post in the future by setting the desired publish date in the Markdown front matter and when the time is right GitHub Actions should trigger a new site deployment automatically.
The problem of triggering a Netlify deployment has already been solved by GitHub Actions for Netlify. So all that’s missing for my use case is to determine if the deployment should be triggered or not.
The action requires two inputs:
time_range_minutestells how far back in time the action should look for published content. This makes it possible to configure any schedule such as daily or hourly.content_directorypoints to the location in the repository where the Markdown content should be searched for.
It also has one output:
is_scheduledis a variable that tells if new content has been scheduled for publishing.
The action is required to read Markdown files from the content directory and check the date front matter value for each of them to determine if any are scheduled. The output value then needs to be set accordingly.
Note that by leaving out the actual deployment I’ve made the action more useful as it’s not bound to a single service. You could also use it with for example GitHub Pages.
Define the action metadata
GitHub needs to know some metadata about your action to be able to run it and to display it on the Marketplace. This is metadata needs to be stored in a file called action.yml at the root of the repository.
You can find the full metadata syntax from the official GitHub documentation but the example here covers the basics for a JavaScript action.
name: 'Markdown Publish Schedule'
description: 'Parses the publish date from Markdown file front matters to see whether there is scheduled content that needs to be published'
inputs:
  time_range_minutes:
    description: 'number of minutes from the current time that should be included for the check'
    required: true
  content_directory:
    description: 'directory to search for .md files'
    required: false
    default: './'
outputs:
  is_scheduled:
    description: 'boolean value indicating if content was scheduled for the current time period'
runs:
  using: 'node12'
  main: 'dist/index.js'
branding:
  color: 'purple'
  icon: 'clock'
The action needs to have a unique name if you want to have it published in the marketplace. A short description is also required.
The inputs section should define the input parameters for your action. These are used to define the environment variables that are passed to your action as inputs. You should mark whether the input is required, and define the default value if needed.
With outputs you can define what values can be used as a result of running your action. This definition is not strictly required and you can set and use outputs without defining them here. However, it’s good practice to list the inputs and outputs here so that others can easily see what options are available.
For JavaScript actions you need to use Node in the runs.using configuration. Different stages of the action can be defined with pre, main and post configurations but in this example I’m using only main which is required. This should point to the file where your action code should start executing.
With the branding section you can define the color and icon that you want to display on the marketplace. The options are listed here.
Preparations
If you want to share the action with multiple repositories you need to create a new repository that holds only your action. If you’re only going to use the action internally on one repository you can place the files in .github/actions/action-name and use that path to refer to the action in the workflow file.
After initializing the repo and adding the action.yml metadata definitions you need to initialize the environment. So clone the repository to your computer and initialize the project:
>> npm init
Then install all the dependencies that you need to build your action. Here are the packages that are required for my action:
>> npm install @actions/core
>> npm install recursive-readdir
>> npm install gray-matter
>> npm install moment
The actions/toolkit repository contains packages that are really useful when building custom actions as they provide access to things such as inputs and outputs, external executables, disk i/o, and the GitHub API. Here I have only installed the @actions/core package which lets me access input and output variables, among other things.
I’ll explain the rest of the dependencies with the actual code.
Implementation
Create a new file called index.js at the root of the repository and implement the action there. If you’re building more complex logic then it can make sense to split the code over many files. Since you’re basically just writing a Node application you can import local files normally.
This is the code for my example action:
const core = require('@actions/core');
const recursiveReaddir = require('recursive-readdir');
const matter = require('gray-matter');
const moment = require('moment');

const timeRangeInMinutes = core.getInput('time_range_minutes', {required: true});
const endTime = moment.utc().seconds(0);
const startTime = endTime.clone().subtract(parseInt(timeRangeInMinutes), 'minutes');
const contentDir = core.getInput('content_directory', {default: ''});

async function run() {
    core.setOutput('is_scheduled', false);
    await recursiveReaddir(contentDir, ['!*.md']).then(files => {
        for (i = 0; i < files.length; i++) {
            if (shouldPublish(files[i])) {
                core.setOutput('is_scheduled', true);
                core.info(`${files[i]} is scheduled`);
                return;
            }
        }
    })
}

function shouldPublish(filename) {
    const file = matter.read(filename);
    if ('date' in file.data) {
        const date = moment.utc(file.data.date);
        return date.isBefore(endTime) && date.isAfter(startTime);
    }
    return false;
}

run();
The file starts with the dependency imports.
The @actions/core package contains the getInput() function which is used to get the time range for the check. Then the moment.js package is used to get the current time in UTC with the seconds adjusted to zero to maintain consistency between the action invocations.
The start time is calculated by subtracting the configured amount of minutes from the end time. Notice that since all Moment objects are mutable the end time needs to be cloned before alterations.
The content directory is also fetched from the inputs if defined.
The main logic of the action is inside the run() function. First, the output value of is_schuduled is set to false. This is the default output value and it is set to true later in the action only if a post has been scheduled. Note that the outputs are handled as environment variables so even though the value is a Boolean in the code it will be converted to a string in the workflow.
The next part uses the recursive-readdir package to list files inside the content directory recursively so that sub-directories are also included. The second parameter to the recursiveReaddir function call is an exclusion rule which excludes all files that don’t end with .md, therefore including only Markdown files.
The promise returns the list of files which is then looped through until a post that needs to be published is found, or until the last item has been checked. If a file should be published the code will break from the loop and exit.
The shouldPublish helper function uses a coo library called gray-matter that can parse front matter from Markdown files. If the date parameter exists in the front matter then it can be parsed to a Moment object and compared against the start and end times.
Build the action
There are two ways that you can provide the action code to the runner environment. The easy way is to commit the node_modules directory in the repository. The drawback is that there can be a huge number of files that are not even needed by the action and the resulting commit diffs get very large.
The recommended way is to utilize the @vercel/ncc package to build the final distribution to a single file that contains only the parts that are actually needed.
Install ncc with this command:
>> npm install @vercel/ncc --save-dev
This installs ncc as a dev dependency. Now edit the package.json and add the build script to the scripts section.
"scripts": {
  "build": "ncc build index.js -o dist --source-map"
},
The distribution can now be compiled with
>> npm run build
This produces a directory called dist which you now need to commit to the repository. Note that any time you make changes to your action you also need to build the distribution so that the runnable code gets updated.
If you look at the action metadata file action.yml you’ll see that the main configuration also points to this dist/index.js file. If you want to commit the node_modules directory then you need to point directly to the index.js instead.
Create a release
To make your action visible in the Marketplace you need to create release. Go to the releases section of your repository and start drafting a new release. GitHub will notice that you are creating a new action so it will automatically show checks for the action metadata.
If the “Publish this Action to the GitHub Marketplace” checkbox is selected the action will become visible on the marketplace. Note that you don’t actually need to publish the action to use it but doing so will help others find it.
Check that the action.yml checks pass. The name needs to be unique so if your preferred name has already been taken by someone else you need to come up with a new one.
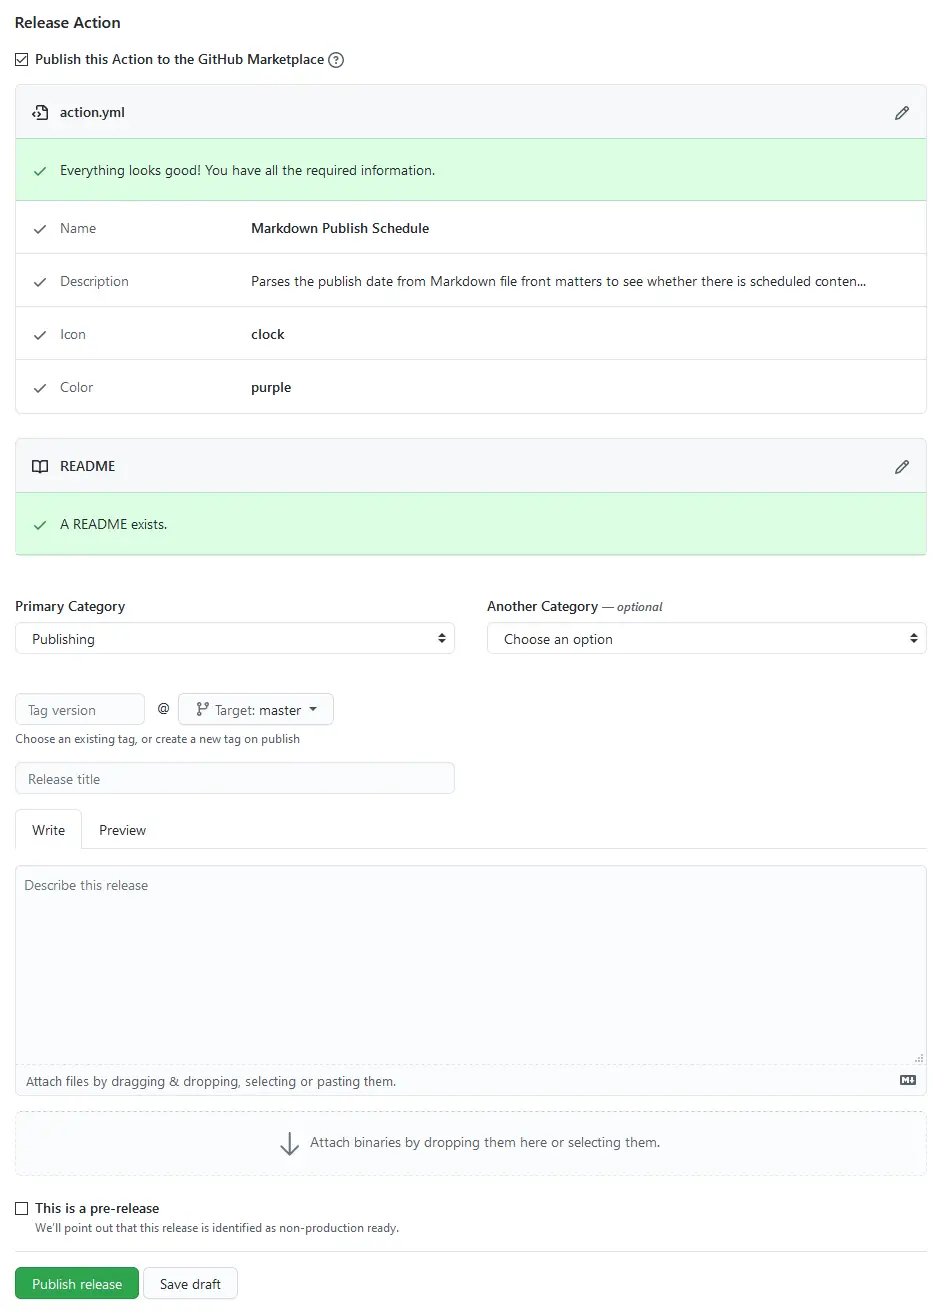
Tag the release with the version number, write a release title and a short description about the changes. The version number is used in the workflow file to select which version of the action should be used. Proper versioning lets you update the action code without breaking other people’s workflows even if you change the interfaces.
Using the action in a workflow
The idea of the action is to be used as a cron job but for testing it’s simpler to just use the pull_request events. I’ll do a separate post about configuring a Netlify deployment workflow. Here’s the simple test:
name: Schedule post

on:
  pull_request:

jobs:
  schedule:
    runs-on: ubuntu-latest
    steps:
    - uses: actions/checkout@v2
    - uses: jannekem/[email protected]
      with:
        time_range_minutes: 720
        content_directory: content
      id: publish
    - name: Run something else
      if: steps.publish.outputs.is_scheduled == 'true'
      run: echo "It is scheduled!"
The action runs on the basic pull request events such as opened or synchronize. The schedule steps start from checking out the repository contents so that the file contents can be inspected.
The newly created action is then called normally with some parameters. Notice that the id parameter is used to set an ID value for the step.
In the next step there is an if condition which checks the is_scheduled output from the publish step. In general step output values are available as steps.<step_id>.outputs.<output_name>.
As I already mentioned the inputs and outputs are treated as environment variables due to the design of Actions. Therefore we need to compare the output value against the string 'true' rather than the Boolean true. Note that single quotes seem to be required here, I tried using double quotes but got strange errors instead.
If the condition evaluates to true the step will be executed, otherwise it will be skipped.
Conclusion
That was a short introduction to creating your own actions. As the next step you could look at the internals of some existing actions to see how they have been implemented and maybe think what you would’ve done differently.
Here I didn’t go that deep into advanced topics. One thing that I’ve noticed is that many actions don’t have any unit tests. That might be one area that I could cover in a future post. In the meantime leave a comment on Twitter or the embedded post and we’ll see on the next post!
Previous post
Backup Files with DuplicacyNext post
Chained Comparisons in Python