Do More with Workflow Commands for GitHub Actions
Janne Kemppainen |If you’ve read my Gentle Introduction to GitHub Actions you should already have a good understanding of the GitHub Actions basics. Creating a workflow is usually quite simple as long as you can find suitable action implementations for your steps. In some cases you may need to write your own actions, but you can actually get quite far with workflow commands.
An important thing you need to remember when working with workflow commands is that all values are always passed around as strings.
What are workflow commands?
Workflow commands are a way to communicate with the GitHub Actions runner machine by printing specially formatted lines of text to the console, or by modifying a file. You can use them quite easily with shell commands, or even inside your custom actions.
For JavaScript actions the @actions/core library takes care of the proper message formatting for you. If your action calls an external script written in another language then you need to follow the correct formatting to interact with the runner.
Workflow commands allow you to share information between workflow steps, print messages with different severity levels to the log (debug, warning, error), set environment variables, and add to system path.
Commands that are printed to the console should have this special formatting:
::command-name parameter1=data1,parameter2=data2::value
Some commands omit the parameters, or even the value, depending on their function.
Note that your whole command must be on a single line, and characters that interfere with the parsing (comma, newline, etc.) need to be URL encoded. You can use the following table to implement replacement rules for the characters.
| Character | Encoded value | Scope |
|---|---|---|
% | %25 | parameter, value |
\r | %0D | parameter, value |
\n | %0A | parameter, value |
: | %3A | parameter |
, | %2C | parameter |
So in short, first encode possible percent signs, then carriage returns and newline characters. For the command parameters you also need to escape colons and commas.
For example, this
This text spans
multiple lines
should be encoded as
This text spans%0Amultiple lines
Correctly parsed commands won’t be visible on the workflow log.
Inputs and outputs
Inputs and outputs allow you to easily share information between steps. Inputs are defined in the with section of a step, and outputs become available for later steps if you define an id for the step with the output.
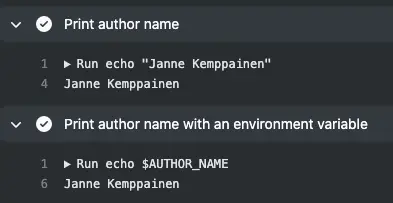
Outputs can be set with the set-output command. It needs an argument, name, to set the output name, and the actual value after the last two colons. In this workflow snippet the run command calls git show to fetch the commit author name and sets it as an output by printing the result as a workflow command.
- name: Get author name
  id: author
  run: echo "::set-output name=author::$(git show -s --format=%an)"
If I made a commit the step would print ::set-output name=author::Janne Kemppainen, which would then parsed as a workflow command by the runner environment. Because I’ve assigned an ID for the step I could access the value in other steps with a normal substitution ${{ steps.author.outputs.author }}.
Here’s a quick explanation of the actual command if you’re not that familiar with Bash. The
echocommand is used to print stuff to the console. The$(...)part evaluates the expression inside the brackets before the whole result is echoed, so the output ofgit showis placed as the value of the workflow command. You should be able to easily adjust this to your own use cases too as long as the command won’t print out multiple lines.
Inputs are defined in the with section of a step. You can access them in your action via environment variables that are formatted as INPUT_{NAME}. Remember to convert the name of the input to uppercase when you try to access it. So if a workflow calls your custom action like this:
- uses: myaccount/my-action@v1
  with:
    argument: Some value
then your action implementation needs to read an environment variable called INPUT_ARGUMENT, which would in this case contain “Some value”. How to actually do this depends on your programming language.
Note that run cannot be used with the with keyword, so this way of handling the input parameters doesn’t work when you run commands directly. Instead, you will need to use env to set an environment variable manually, or do a direct replacement on the command line:
name: Inputs and outputs

on:
  push:

jobs:
  inputs-outputs:
    runs-on: ubuntu-latest
    steps:
      - uses: actions/checkout@v2
      - name: Get author name
        id: author
        run: echo "::set-output name=author::$(git show -s --format=%an)"
      - name: Print author name
        run: echo "${{ steps.author.outputs.author }}"
      - name: Print author name with an environment variable
        run: echo $AUTHOR_NAME
        env:
          AUTHOR_NAME: ${{ steps.author.outputs.author }}
There is a small distinction between these two ways. In the first version the output is directly replaced before running the command, as you can see from the image below. The second version uses an environment variable as an intermediate storage. Both versions still work essentially the same but use the second option if you don’t want to see the actual value in the command log (when you pass in an API key, for example).
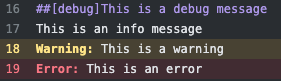
Printing with different severity levels
When you print or echo something that does not match a workflow command it will appear in the workflow log as normal text. You can think of this as info level logging. For other severities you need to use workflow commands.
Remember to percent encode the newline characters when printing multiline messages!
Debug level messages contain information that you want to show only when you need to find an what’s causing an issue in a workflow. They become visible only after you have enabled debug logging. Sending debug messages is easy:
echo "::debug::This is a debug message"
Warning messages appear with yellow a yellow highlight and the text “warning”. Warnings are also shown on the annotations list on the job status page. You can create a warning message without any arguments, or include file details like shown below:
echo "::warning file=script.py,line=1,col=7::Unused import 'os'"
Errors work in the exact same way but the highlight color is red.
echo "::error file=script.py,line=5,col=4::Command failed"
This snippet uses all logging formats.
- name: Log levels
  run: |
    echo "::debug::This is a debug message"
    echo "This is an info message"
    echo "::warning::This is a warning"
    echo "::error::This is an error"
And this is how they show up on the workflow log.
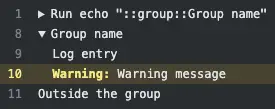
Log grouping
If you expect to log lots of content you should definitely know about the grouping functionality. The group and endgroup commands let you combine output in an expandable section so that you don’t have to scroll so much when you’re not interested in a particular part of the log output.
This example shows how it works in practice:
- name: Log grouping
  run: |
    echo "::group::Group name"
    echo "Log entry"
    echo "::warning::Warning message"
    echo "::endgroup::"
    echo "Outside the group"
You can name the group by changing the value of the group command. The endgroup command doesn’t take any arguments but it ends the latest open group.
The group can be expanded when needed, it is hidden by default.
Mask sensitive data
When you use repository secrets GitHub will automatically mask their values out from the log if you try to print them. However, your action may also use sensitive data from other sources, for example in the form of temporary API keys.
Use the add-mask command if you want to be sure that you don’t leak sensitive information to the log output. You can mask a string value directly, or use an environment variable.
- name: Mask sensitive data
  run: |
    echo "::add-mask::password123"
    echo "My password is password123"
    echo "::add-mask::$SUPER_SECRET"
    echo "Here's a secret for you: $SUPER_SECRET"
  env:
    SUPER_SECRET: The cake is a lie.
The secret data will be replaced with ***, preventing you from accidentally leaking it to the logs.
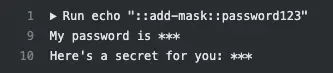
Note that because in this example I have explicitly written the secrets in the commands and the environment variables they are visible in the step information before the actual ouptut. Never commit sensitive data to the repository!
Add to system path
The PATH environment variable tells all the places where the computer tries to find executables when it only gets the executable name. If your step installs an executable in a non-standard location you will have to edit the system path to make it findable.
The $GITHUB_PATH environment variable holds the path to a file that you can use to add entries to the system path. The changes will become available for all later steps, but not the current one.
Assume that you copied a custom executable to /usr/local/myapp/myapp and want to be able to call myapp in later steps. You have to add /usr/local/myapp to the system path like this:
- name: Add to path
  run: |
        echo "/usr/local/myapp" >> $GITHUB_PATH
This will add your custom path to the end of the file that the action runner reads before starting to execute the step.
If you’re using another programming language you can read the filename from the environment variable and use the native file system functions to append new entries. Here’s a simple Python equivalent>
def add_path(path):
    with open(os.getenv("GITHUB_PATH"), "a") as github_path:
        print(path, file=github_path)
This one is taken from my Run Python Script action that lets you write Python code directly inside the workflow YAML file. You can check the action implementation to see those workflow commands in actual use, the implementation should be relatively easy to follow (the utility Python script is located in the dist directory).
Conclusion
The GitHub Actions workflow commands aren’t that difficult when you get used to how they are formatted, or which files you need to edit. Go and create some useful workflows with your newfound skills!
Discuss on Twitter
Do you know how to use workflow commands with GitHub Actions? Maybe you should! https://t.co/bmokfedhSU
— Janne Kemppainen (@pakstech) February 1, 2021
Previous post
Return Many Values as Attributes in Python