Set Up a Raspberry Pi Home Server With Remote Access
Janne Kemppainen |In this blog post we will set up a Raspberry Pi home server and configure it to be accessible from the internet via SSH. You will also learn how to set up SSH forwarding so that you can access web pages that might be served in your private network without exposing them to the outside world.
Sure every other blog has instructions on installing Raspbian but I like to have an internal resource where to link to. This works as the “standard installation” for future blog posts.
If you already have the Rapsbian OS installed you can skip ahead to the remote access setup.
Requirements
Make sure that you have the following components available:
- Raspberry Pi (preferrably version 2 or above)
- Compatible SD card
- USB-charger (recommended 2A output or more)
- Card reader
Download and flash Raspbian on the SD card
First, go to the download page for Raspbian and get the latest version of Raspbian Stretch Lite as we will be using the Pi headless. If you want to hook it up to a monitor then feel free to choose a desktop version.
Next, download and install Etcher. This is a simple to use program for flashing system images on external drives and flash cards. It is compatible with Windows/Mac/Linux and has a similar interface on all platforms so these instructions apply to them all.
Insert the SD card to the card reader, unzip the downloaded Raspbian image file and open Etcher. The flashing is really straight forward:
- Click “Select image” and select the Raspbian Lite .img file that you unzipped
- Select the SD card drive. Make sure that you have selected the correct drive!
- Flash!
It takes a couple of minutes so wait until the process is finished.
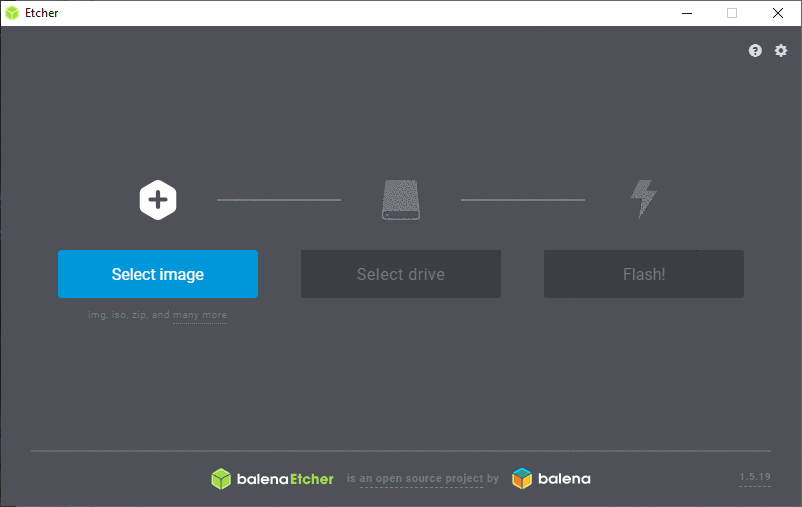
Steps to flash the Raspbian image
Headless setup with WiFi
The SD card drive should be visible on your system with the name boot. We will add two files to enable SSH (for remote access) and to set up the network credentials.
Enable SSH
SSH access can be enabled by adding an empty file called ssh or ssh.txt under the root of the SD card.
Windows
Right click in File Explorer and select New > Text Document and change the filename to ssh.
Mac
On a Mac you can just open terminal and use touch:
>> touch /Volumes/boot/sshSet up WiFi
This is assuming you have a WiFi capable version of Raspberry Pi. If you can’t get wireless connection to work you can connect with an Ethernet cable and skip this step.
Create another file called wpa_supplicant.conf inside the SD card root and add the following configurations:
country=FI
ctrl_interface=DIR=/var/run/wpa_supplicant GROUP=netdev
update_config=1

network={
    ssid="Network_name"
    scan_ssid=1
    psk="password"
    key_mgmt=WPA-PSK
}
Replace country name with the two letter code for your country and the network ssid (case sensitive) and password (psk) with the correct ones for your network. If you are using notepad on Windows you’ll need to select All Files (*.*) for the file type and include the .conf extension in the filename before saving.
Insert the SD card to the Pi and connect it to a power source. The Pi should try to connect to the wireless network after booting.
Find your Pi
Assuming you managed to set up the network settings properly the Pi should be now connected to your wireless router automatically. Because we are doing a headless installation we can’t see the actual IP address from the Pi as we don’t have a screen attached.
Below are some methods you can try to find your Pi’s address.
Option 1: From the router admin page
Probably the easiest way to find your Pi is to log in to your wireless router admin page and find the connected devices. For example on my Asus device the admin page can be found from http://192.168.1.1, consult the user manual of your router to get to the admin page and to see connected devices. The image below is from my router settings:
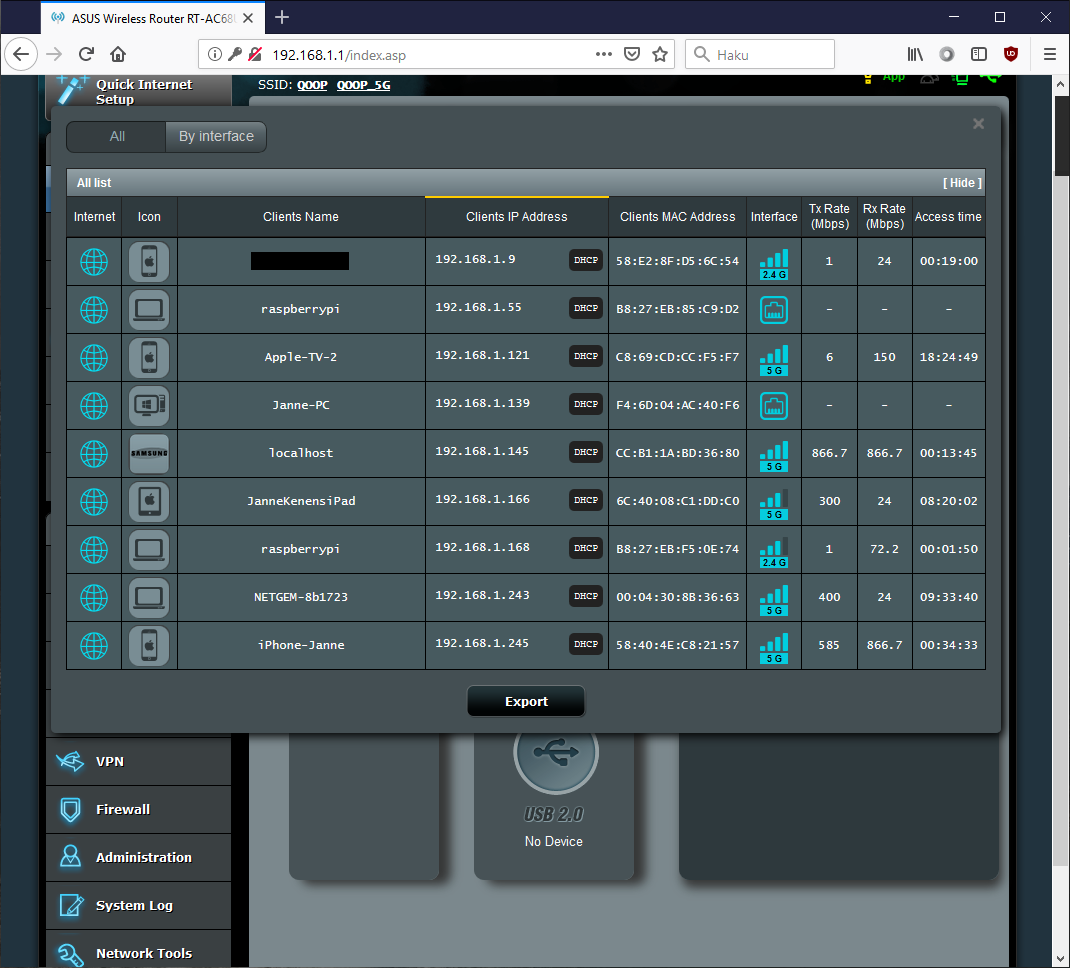
Raspberry Pi’s listed on the router admin panel
Currently I have two Raspberry Pi’s connected to the same router but I know that the one with the IP ending with .55 is my old RPi 1. Therefore the other raspberrypi client is the newly installed one. Write it down or just remember the value.
If you can’t find your Pi listed on your router you can try going back to the WiFi setup and create a new wpa_supplicant.conf file to the SD card and try again. You may have given the wrong network credentials; remember that the SSID is case sensitive.
Option 2: Use Nmap
If your router doesn’t have the option to see the connected devices or if you don’t have admin access to the router you can use nmap to search for devices in your local network. Make sure that you are allowed to do port scanning if it’s not your own network.
You can find install instructions and more information of Nmap from nmap.org. If you are on Windows you can use a GUI version of Nmap but we will be using the command line. Note that Nmap is one of those programs that don’t work under Windows Subsystem for Linux so you need to install it natively on Windows. Open the Command Prompt for the next steps.
On Linux open a terminal and use the package manager to install nmap:
>> sudo apt install -y nmapOn a Mac I recommend using Homebrew for installation from terminal:
>> brew install nmapNow that Nmap is installed we can search for devices that expose the SSH port 22. You will need to know the IP range of your local network. If you don’t already know it you find it out by checking your own IP address with the ifconfig command (or ipconfig on Windows):
>> ifconfig
eth0: flags=4163<UP,BROADCAST,RUNNING,MULTICAST>  mtu 1500
        inet 192.168.1.139  netmask 255.255.255.0  broadcast 192.168.1.255
        ether f4:6d:04:ac:40:f6  (Ethernet)
        RX packets 0  bytes 0 (0.0 B)
        RX errors 0  dropped 0  overruns 0  frame 0
        TX packets 0  bytes 0 (0.0 B)
        TX errors 0  dropped 0 overruns 0  carrier 0  collisions 0

eth1: flags=4163<UP,BROADCAST,RUNNING,MULTICAST>  mtu 1500
        inet 192.168.168.1  netmask 255.255.255.0  broadcast 192.168.168.255
        inet6 fe80::2d7c:ca01:66d1:9f19  prefixlen 64  scopeid 0xfd<compat,link,site,host>
        ether 00:50:56:c0:00:08  (Ethernet)
        RX packets 0  bytes 0 (0.0 B)
        RX errors 0  dropped 0  overruns 0  frame 0
        TX packets 0  bytes 0 (0.0 B)
        TX errors 0  dropped 0 overruns 0  carrier 0  collisions 0

eth2: flags=4163<UP,BROADCAST,RUNNING,MULTICAST>  mtu 1500
        inet 169.254.125.184  netmask 255.255.0.0  broadcast 169.254.255.255
        inet6 fe80::687f:7311:4280:7db8  prefixlen 64  scopeid 0xfd<compat,link,site,host>
        ether 00:15:5d:3a:4a:55  (Ethernet)
        RX packets 0  bytes 0 (0.0 B)
        RX errors 0  dropped 0  overruns 0  frame 0
        TX packets 0  bytes 0 (0.0 B)
        TX errors 0  dropped 0 overruns 0  carrier 0  collisions 0

eth3: flags=4163<UP,BROADCAST,RUNNING,MULTICAST>  mtu 1500
        inet 192.168.131.1  netmask 255.255.255.240  broadcast 192.168.131.15
        inet6 fe80::592:3d87:2714:bee4  prefixlen 64  scopeid 0xfd<compat,link,site,host>
        ether 9e:15:d3:a2:2f:aa  (Ethernet)
        RX packets 0  bytes 0 (0.0 B)
        RX errors 0  dropped 0  overruns 0  frame 0
        TX packets 0  bytes 0 (0.0 B)
        TX errors 0  dropped 0 overruns 0  carrier 0  collisions 0

lo: flags=73<UP,LOOPBACK,RUNNING>  mtu 1500
        inet 127.0.0.1  netmask 255.0.0.0
        inet6 ::1  prefixlen 128  scopeid 0xfe<compat,link,site,host>
        loop  (Local Loopback)
        RX packets 0  bytes 0 (0.0 B)
        RX errors 0  dropped 0  overruns 0  frame 0
        TX packets 0  bytes 0 (0.0 B)
        TX errors 0  dropped 0 overruns 0  carrier 0  collisions 0
The output above is from my WSL installation. It shows quite many interfaces but the eth0 is my actual LAN interface and the IP associated with it is 192.168.1.139. The netmask 255.255.255.0 means that the network has 256 available addresses so therefore my network is 192.168.1.0/24. Other common values are 192.168.0.x/24 or 192.168.100.x/24. Below is a calculator that you can use to get the correct network based on your local IP and netmask.
Now that you know your network you can use nmap to find the Pi. In my case the command is:
>> nmap -p 22 --open -sV 192.168.1.0/24Replace the IP network with the one you got from the calculator. The result on my Windows machine looks like this:
C:\Users\Janne>nmap -p 22 --open -sV 192.168.1.0/24
Starting Nmap 7.70 ( https://nmap.org ) at 2019-04-07 18:07 FLE Daylight Time
Nmap scan report for 192.168.1.55
Host is up (0.00s latency).

PORT   STATE SERVICE VERSION
22/tcp open  ssh     (protocol 2.0)
1 service unrecognized despite returning data. If you know the service/version, please submit the following fingerprint at https://nmap.org/cgi-bin/submit.cgi?new-service :
SF-Port22-TCP:V=7.70%I=7%D=4/7%Time=5CAA1250%P=i686-pc-windows-windows%r(N
SF:ULL,29,"SSH-2\.0-OpenSSH_7\.4p1\x20Raspbian-10\+deb9u4\n");
MAC Address: B8:27:EB:85:C9:D2 (Raspberry Pi Foundation)

Nmap scan report for 192.168.1.168
Host is up (0.098s latency).

PORT   STATE SERVICE VERSION
22/tcp open  ssh     (protocol 2.0)
1 service unrecognized despite returning data. If you know the service/version, please submit the following fingerprint at https://nmap.org/cgi-bin/submit.cgi?new-service :
SF-Port22-TCP:V=7.70%I=7%D=4/7%Time=5CAA1250%P=i686-pc-windows-windows%r(N
SF:ULL,29,"SSH-2\.0-OpenSSH_7\.4p1\x20Raspbian-10\+deb9u4\n");
MAC Address: B8:27:EB:F5:0E:74 (Raspberry Pi Foundation)

Nmap scan report for NETGEM-8b1723 (192.168.1.243)
Host is up (0.25s latency).

PORT   STATE SERVICE VERSION
22/tcp open  ssh     OpenSSH 7.6 (protocol 2.0)
MAC Address: 00:04:30:8B:36:63 (Netgem)

Service detection performed. Please report any incorrect results at https://nmap.org/submit/ .
Nmap done: 256 IP addresses (10 hosts up) scanned in 27.08 seconds
In my case Nmap found two Raspberry Pi’s and a set-top-box that have the port 22 available. The first Pi with an IP ending with .55 is my old one so the address of my new installation is 192.168.1.168.
Option 3: Log in locally
If all else fails you can connect a keyboard an a monitor to your Pi and log in with the username pi and password raspberry. Then you can use ifconfig to find out the IP address of the Pi.
Logging in
Now we know where we can find the Raspberry Pi so it is time to make an SSH connection. If you are using Linux or Mac then ssh is already available on the terminal. On Windows you have two options:
- Enable Windows Subsystem for Linux (WSL) and install the Ubuntu subsystem, you can find install instructions from my previous blog post, or
- Download and install PuTTY
If you are using PuTTY you only need to set the host name to [email protected] and click ‘Open’ or hit Enter. Of course you need to use the IP address that you found earlier. The default password is raspberry.
If you are using Linux/Mac/WSL then use the command (using the correct IP)
>> ssh [email protected]Type yes when asked to proceed connecting and give the password raspberry. You should now be logged in to your Pi:

Logged in to the Raspberry Pi
After logging in the Pi tells you that you are still using the default password which is a security risk. Change the password with the passwd command as instructed.
Post-installation steps
Now the Pi is ready to be used but there are still some configurations that we should do after installation.
Expand the filesystem
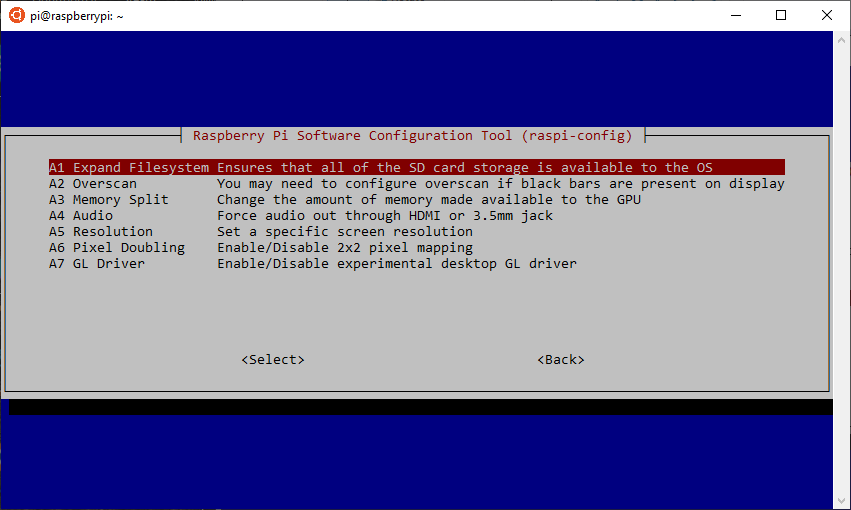
After installation the system will use only a portion of the available space on the SD card. To utilize the full capacity of the card you need to expand the filesystem. Luckily this is easy with raspi-config. Type the following command in the terminal:
>> sudo raspi-configThe configuration screen should open. Navigate to 7 Advanced Options and then select the first item Expand Filesystem and the script will do all the work for you. Exit the configuration screen and reboot when prompted.
Raspi-config screen Expand filesystem option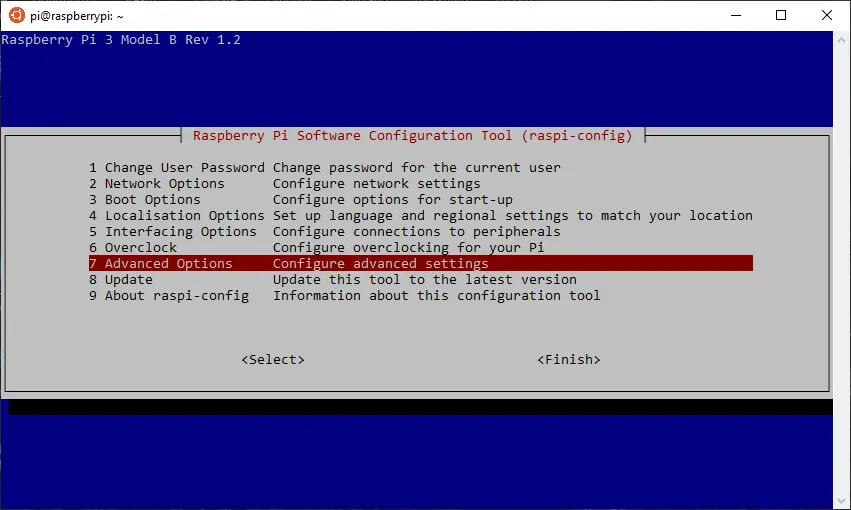
Software update
To keep the OS up to date with the latest software you need to run the software update every now and then. Use the following command to upgrade the installed packages:
>> sudo apt-get update && sudo apt-get dist-upgradeRemote access setup
This part is optional as your Pi is now accessible from the local network. If you also want to have access to the Pi when you’re not at home then follow the rest of this tutorial to configure port forwarding, dynamic DNS, SSH hardening and SSH tunneling.
Note that exposing your Pi to the Internet may cause security issues and it is important that you keep your software up to date.
Port forwarding
When your Pi is connected to the home router it is behind a NAT (Network Address Translation). This means that all machines inside your network seem to come from the the same IP address and there is no one-to-one mapping of addresses when trying to access a machine from the outside. Connections can only be initiated from inside of the local network and connections from the outside are dropped.
If you try to access SSH using the public adress of your network the router won’t know to which machine it should forward the traffic. This is actually good security-wise because it inherently prevents unauthorized users from accessing your private network.
Because of the NAT we need to set up port forwarding to access a specific machine. The idea is that we add a rule where inbound connections to a specific port are forwarded to a predefined machine instead of being dropped. Therefore we can configure multiple servers behind the same address, as long as we are using different ports.
To set up port forwarding go to the admin page of your router and find the settings page for port forwarding. On Asus routers you need to select WAN from the Advanced Settings and then select the Virtual Server / Port Forwarding tab. Set the port range to 2222. This is the port that you’ll need to use when accessing the Pi from the outside. Set the Local IP to point to the IP address of the Pi and set the Local Port to the SSH default port 22. Choose TCP protocol. Again, consult your router’s user manual if necessary.

Port forwarding set for SSH and a game server
Check the public IP address of your home network by visiting https://www.whatsmyip.org/ and write it down. Now disconnect from your home network and use some other connection such as your mobile phone hotspot. Try accessing the pi with
>> ssh -p 2222 pi@youripReplace yourip with the public address of your home network. If you are using PuTTY remember to change the port to 2222. You can even try using a mobile SSH app!

Successfully connected on iOS with the Termius app
Dynamic DNS
The bad thing with home internet connections is that it is not guaranteed that you will always have the same external IP address. So even if you can connect to the server right now with the IP address it might not work after a week or a month. That is why dynamic DNS services exist.
The way that a dynamic DNS works is that your server pings the DNS service provider periodically and the dynamic DNS service keeps track of the latest IP address it was pinged from. You then get your own subdomain that points to the latest IP address of your server.
We will be using a free service called Duck DNS. So go to http://www.duckdns.org and sign in with the authentication provider of your choice (they don’t have their own registration form). I’m using my GitHub credentials.
With a free account you can create five domains but we will only need one. After logging in you will see a screen where you can enter your desired domain name. Try to find one that is available and click “add domain”. Click “install” on the navigation bar and select “pi” as the operating system. This will give you instructions on how to set up the automatic IP update.
After running the duck.sh script you should see your public IP address listed next to your new domain on the Duck DNS page. Try logging in using this domain, for example:
>> ssh -p 2222 [email protected]If you’ve done everything correctly you should now be able to connect to your Pi using the Duck DNS domain.
SSH hardening
As the Pi SSH port is now exposed to the Internet it is a good idea to protect it from possible hackers by changing to more secure settings. This is called hardening.
Beware that editing the SSH configurations can block you out of remote access if you’re not careful.
Backup configurations
First you should back up the current configurations so that you can roll back if you break something.
>> sudo cp /etc/ssh/sshd_config /etc/ssh/sshd_config.backupTest configurations
Always validate the configuration before applying the changes with:
>> sudo sshd -tApplying changes
After you have made the changes to the config file and validated it you need to reload the SSH daemon:
>> sudo systemctl reload sshdHardening steps
We will be making configurations on the Pi to the /etc/ssh/sshd_config file as well as do configurations on the local computer.
1. Disable root login
On the Pi you can use Nano to edit the sshd_config file.
>> sudo nano /etc/ssh/sshd_configThere is no need to log in with the root user so you can disable it with the following configuration:
PermitRootLogin noSave and exit the editor.
2. Create a new user for remote login
The user pi is such a common username that hackers would probably try to use it to log in with different password combinations. Therefore having some other username potentially reduces the risk of being hacked. Use the command below on your Pi to create a new user and follow the prompts.
>> sudo adduser janneNaturally you need to give the username that you want to be created instead of my name ;). Next, add the new user to the sudoers group.
>> sudo usermod -aG sudo janneTest that the sudo rights work:
pi@raspberrypi:~ $ su - janne
Password:
janne@raspberrypi:~ $ sudo ls

We trust you have received the usual lecture from the local System
Administrator. It usually boils down to these three things:

    #1) Respect the privacy of others.
    #2) Think before you type.
    #3) With great power comes great responsibility.

[sudo] password for janne:
janne@raspberrypi:~ $ exit
3. Set up SSH keys
Up until now you have been logging in with a username and password. It might be possible to brute force the user credentials if the password is not strong enough. A safer way is to use SSH keys which are harder to crack. You may already have generated SSH keys but let’s create a separate key file that is only used for this server. It will also have strong RSA 4096 encryption.
Open a terminal on your own machine and create a new SSH key with the command below.
>> ssh-keygen -f ~/.ssh/raspi_id -b 4096
Generating public/private rsa key pair.
Enter passphrase (empty for no passphrase):
Enter same passphrase again:
Your identification has been saved in /Users/janne/.ssh/raspi_id.
Your public key has been saved in /Users/janne/.ssh/raspi_id.pub.
The key fingerprint is:
SHA256:rgzIGK/GT9v5eBBPJM1JCQ15hCs99uF8Ys3Gq1gZmnI [email protected]
The key's randomart image is:
+---[RSA 4096]----+
|     o@oo        |
|     + O         |
|    . =          |
|   . * o         |
|.   o O.S        |
| = . .oOo*       |
|o +o.Eoo= .      |
| +. =o=o .       |
|o .o ==o.        |
+----[SHA256]-----+
I recommend that you choose a secure password for the key file because otherwise anyone with access to the SSH key will be able to access your server. Next we need to use ssh-copy-id to copy the generated public key to the server.
>> ssh-copy-id -i ~/.ssh/raspi_id.pub -p 2222 [email protected]You can also use the local IP of the Pi instead of the DNS name if you are connected to the local network, then you don’t need to specify the port 2222.
Open ~/.ssh/config in an editor (create the file if it doesn’t exist) and add the host configuration:
Host home
    HostName pakstechhome.duckdns.org
    User janne
    Port 2222
    IdentityFile ~/.ssh/raspi_id
Change the HostName and User according to your setup and save the file. Now you can log into the Pi with:
>> ssh homeYou will be asked for the passphrase for the key but not for the user account. If you try to log in with the ssh -p 2222 [email protected] format you will still be asked for a password.
If you get the error message Bad owner permissions on /home/username/.ssh/config you need to change the file permissions:
>> chmod 600 ~/.ssh/configThis will grant read and write access only to your account and make SSH happy. Try logging in again.
4. Disable password login from the outside
Now that we have set up key based login we can disable password authentication for connections that come from outside of the home network. Because connections coming from the outside are port forwarded through the router they actually seem to come from inside the home network. Therefore we need to take this into account when we update the sshd configuration.
Log in to the Pi and open the sshd_config file
>> sudo nano /etc/ssh/sshd_configThere is a row containing PasswordAuthentication; uncomment it and disable password authentication:
PasswordAuthentication noThen add the following two blocks at the end of the file in this order:
Match Address 192.168.1.1
    PasswordAuthentication no

Match Address 192.168.0.0/16
    PasswordAuthentication yes
Change the address of the first block to your router address so that connections coming from the port forwarding can’t authenticate with a password. For any other machine inside the local network either password or SSH key sign on should work.
Test that the configuration doesn’t have errors.
>> sudo sshd -tThe above command shouldn’t print anything if all is well. Reload the sshd service.
>> sudo systemctl reload sshdIf this gives you an error message give the command below and try again.
>> sudo systemctl enable sshIf you now try to log in through the forwarded port without the SSH key your request should fail. However, using ssh home you should be able to get in!
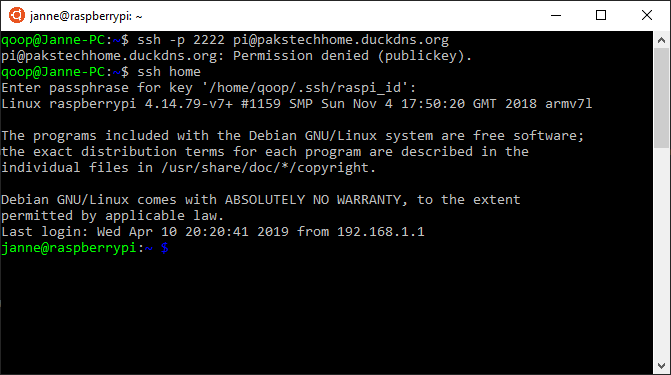
Logging in with a password fails but it works with a SSH key
Note that we didn’t need to disable logging in with pi because we didn’t set SSH keys for that user. Therefore there is no way to log in from the outside with the user pi. It still works from the home network, though.
5. Disable X11Forwarding
X11Forwarding is needed for running GUI applications remotely. Because we are not using any graphical user interface on our server we can disable this. Change the line
X11Forwarding yesto
X11Forwarding noTest the configurations and reload the sshd service. Now your Pi should be reasonably well protected from malicious attacks.
SSH tunneling
With SSH tunneling you can access services in your home network from the outside by forwarding them to your loopback address (localhost). For example, the local address of my router admin page is 192.168.1.1:80 so I can create an SSH forwarding rule to map it to localhost:8080 on my own machine. Now if I would make an SSH connection to the server I could go to http://localhost:8080 on my browser to access the router settings even if I wasn’t at home.
To set up SSH tunneling you need to edit the SSH configuration file ~/.ssh/conf on your own machine and add the following configuration:
Host homeforward
    HostName yourdomain.duckdns.org
    User username
    Port 2222
    IdentityFile ~/.ssh/raspi_id
    LocalForward 8080 192.168.1.1:80
Replace the HostName with your DuckDNS hostname and the username with the one that you configured for remote login. The LocalForward here is just an example and you can create forwarding rules for any address in your network. The first parameter is the port on your own machine where you want to bind the connection to and the second parameter is the IP address and port of the remote server that you want to connect to.
To create the tunnel just start a new SSH connection.
>> ssh homeforwardWe could’ve added the LocalForward to the home host setting but this would always open the tunnel when connecting to the server. I think it is better to have a separate host configuration for this purpose.
Conclusion
I hope this wasn’t too much information at once and that you managed to follow through the tutorial. You should now have a good foundation to start tinkering with the Raspberry Pi. If you have any questions or spot errors you can contact me on Twitter.
Discuss on Twitter
I wrote up a tutorial for installing Raspbian on a #RaspberryPi without attaching a display. But I think the most useful part of that article is configuring and hardening remote #SSH access. Tell me if you think there is something to be improved! https://t.co/SnX2kwKcL3
— Janne Kemppainen (@pakstech) April 11, 2019
Previous post
How to Develop With Windows Subsystem for Linux?